
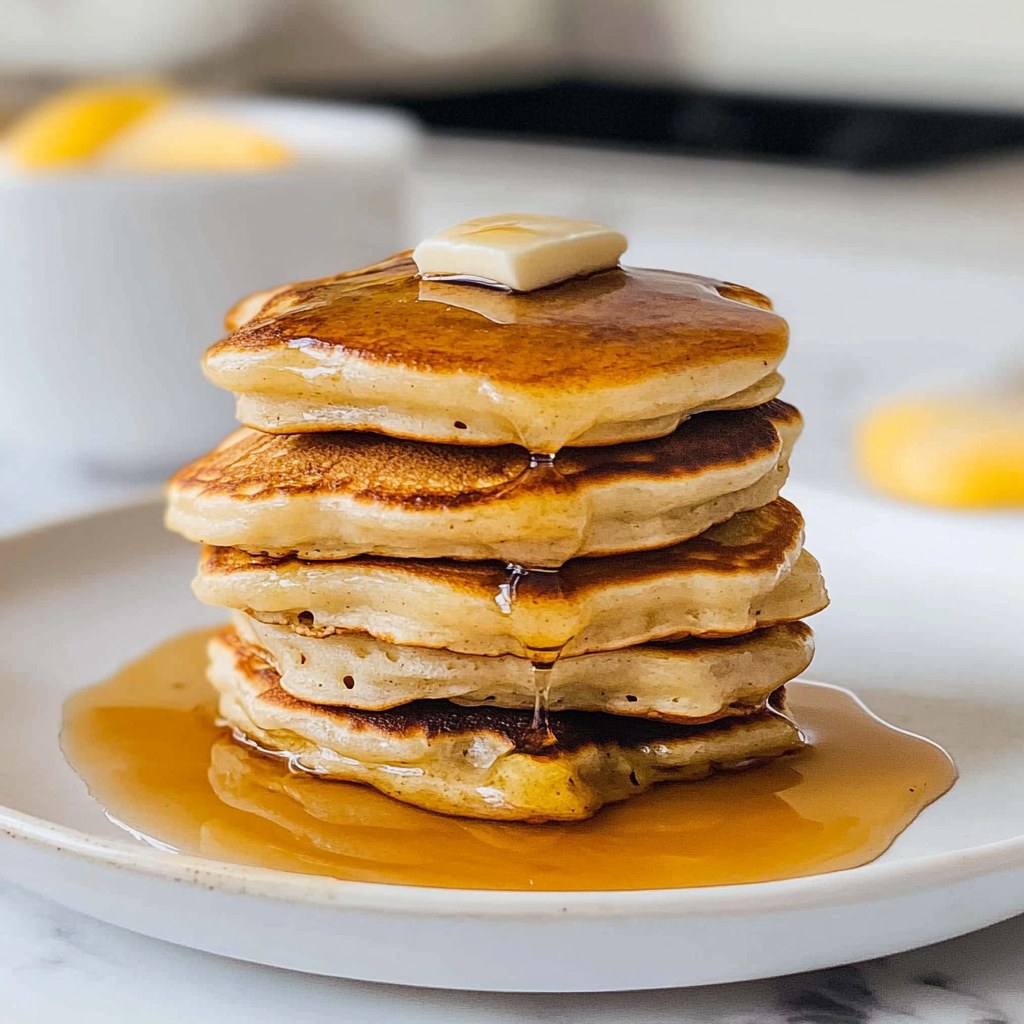
There’s something magical about waking up to the sweet aroma of freshly made mini silver dollar pancakes wafting through the air. Imagine fluffy, bite-sized morsels of goodness that are just waiting to be drizzled with maple syrup and topped with berries. You can practically hear them singing, “Eat me!” as they sit on your plate, beckoning you to start your day with a smile.
Let’s be honest, who doesn’t want to start their morning with a stack of these adorable pancakes? They’re not just pretty; they’re deliciously fluffy and delightfully versatile. Whether it’s a lazy Sunday brunch or a quick weekday breakfast, mini silver dollar pancakes are the answer to your culinary prayers.
Why You'll Love This Recipe
- This recipe is a breeze to whip up, perfect for both novice cooks and seasoned chefs alike.
- Each pancake bursts with flavor, making breakfast feel like a special occasion every day.
- Their charming size makes them visually appealing, enticing everyone at the table.
- Plus, you can customize toppings based on what you have in your kitchen!
Ingredients for Mini silver dollar pancakes
Here’s what you’ll need to make this delicious dish:
- All-Purpose Flour: Essential for creating that fluffy texture; make sure it’s fresh for the best results.
- Baking Powder: This is your secret weapon for light and airy pancakes; don’t skip it!
- Granulated Sugar: Just a touch of sweetness helps balance the flavors; adjust to taste.
- Salt: A pinch enhances all the other flavors; trust me on this one.
- Milk: Use whole milk for creaminess or any milk alternative that you prefer.
- Eggs: These help bind everything together while adding richness; go for large eggs.
- Butter: Melted butter brings in flavor and moisture—so don’t skimp here!
The full ingredients list, including measurements, is provided in the recipe card directly below.
How to Make Mini silver dollar pancakes
Follow these simple steps to prepare this delicious dish:
Step 1: Prepare the Batter
In a large mixing bowl, combine all-purpose flour, baking powder, granulated sugar, and salt. Whisk those dry ingredients together like they’re long-lost friends reuniting at a party.
Step 2: Add Wet Ingredients
Now it’s time for some liquid love! In another bowl, whisk together milk, eggs, and melted butter until well combined. Slowly pour this mixture into the dry ingredients while stirring gently until just blended. Don’t overmix—lumpy batter is your friend!
Step 3: Heat Your Pan
Place a non-stick skillet over medium heat and let it warm up like it’s preparing for its big debut. You can test if it’s ready by dropping a small amount of batter onto the surface; if it sizzles happily, you’re good to go!
Step 4: Cook the Pancakes
Using a tablespoon or small ladle, pour batter onto the skillet in tiny rounds (about two inches wide). Watch those little circles bubble up as they cook! Flip them once you see bubbles forming on top—this should take around two minutes per side.
Step 5: Keep Them Warm
As you cook more pancakes, keep them warm in an oven preheated to about 200°F (93°C). This step ensures that everyone gets to enjoy hot pancakes at once instead of serving them one-by-one like an awkward dinner date.
Step 6: Serve and Enjoy!
Once all mini silver dollar pancakes are cooked and warmed through, stack them high on plates. Drizzle with maple syrup or honey (or both), add fresh berries or whipped cream if you’re feeling extra fancy—and dig in!
These mini silver dollar pancakes will surely bring joy not just to your mornings but also to any brunch gathering or even cozy breakfast-for-dinner nights! So grab your spatula and get flipping—you won’t regret it!
You Must Know
- These delightful mini silver dollar pancakes are not just a breakfast treat; they bring joy and nostalgia to any meal.
- Their fluffy texture and golden hue make them irresistible.
- Perfect for brunch, kids’ parties, or those cozy mornings when you want to treat yourself!
Perfecting the Cooking Process
To achieve pancake perfection, start by mixing your batter while the pan heats up. Pour in small rounds and flip when bubbly. This efficient sequence ensures even cooking and fluffy results every time.
Add Your Touch
Feel free to customize your mini silver dollar pancakes with add-ins like blueberries or chocolate chips. You can swap regular flour for whole wheat or add a splash of vanilla for an extra flavor boost!
Storing & Reheating
Store leftover mini silver dollar pancakes in an airtight container in the fridge for up to three days. To reheat, simply pop them in the toaster or microwave until warm, restoring their delightful fluffiness.
Chef's Helpful Tips
- For perfectly fluffy mini silver dollar pancakes, let your batter rest briefly before cooking.
- Avoid flipping too early—wait for bubbles!
- Also, use a non-stick skillet for easy cooking and cleanup.
Sharing these mini silver dollar pancakes at a family gathering led to my niece declaring me “the best aunt ever!” It’s amazing how food can create such memorable moments together.
FAQs :
What are mini silver dollar pancakes?
Mini silver dollar pancakes are small, fluffy pancakes that resemble the size of a silver dollar coin. These delightful treats are perfect for breakfast or brunch. Made with basic ingredients such as flour, eggs, milk, and baking powder, they cook quickly on a skillet. Their smaller size makes them ideal for serving to kids or as part of a larger pancake breakfast spread. You can customize them with various toppings like syrup, fresh fruit, or whipped cream, making them a versatile choice for any meal.
How do I make mini silver dollar pancakes fluffy?
To achieve fluffy mini silver dollar pancakes, it’s essential to properly mix your batter without overmixing. Combine your dry and wet ingredients until just blended; lumps are okay! Additionally, using fresh baking powder and letting your batter rest for a few minutes before cooking can help create air bubbles. Cooking on medium heat also allows the pancakes to puff up nicely without burning. Fluffy mini pancakes can elevate your breakfast game significantly.
Can I make mini silver dollar pancakes ahead of time?
Yes, you can prepare mini silver dollar pancakes ahead of time! To do this, cook the pancakes and allow them to cool completely. Once cooled, stack them with parchment paper between each layer to prevent sticking and store them in an airtight container in the refrigerator for up to three days. You can reheat them in the toaster or microwave when ready to serve. This method ensures you have delicious pancakes ready whenever you need a quick breakfast option.
What toppings go well with mini silver dollar pancakes?
Mini silver dollar pancakes pair wonderfully with a variety of toppings! Classic choices include maple syrup or honey for sweetness. Fresh fruits like strawberries, blueberries, or bananas add a burst of flavor and nutrition. For something richer, try adding whipped cream, chocolate chips, or nut butter. You can even get creative by incorporating flavored syrups or yogurt for an extra twist. The possibilities are endless when it comes to enhancing your mini silver dollar pancake experience!
Conclusion for Mini silver dollar pancakes :
Mini silver dollar pancakes are a delightful option for breakfast lovers who enjoy bite-sized treats. They’re easy to make and customize with various toppings, making them suitable for both kids and adults alike. By following simple techniques such as not overmixing the batter and using fresh ingredients, you can achieve fluffy results every time. Whether enjoyed plain or dressed up with delicious toppings, these mini pancakes can bring joy to any morning meal or brunch gathering. Indulging in these treats will surely brighten up your day!

Mini Silver Dollar Pancakes
- Prep Time: 10 minutes
- Cook Time: 10 minutes
- Total Time: 20 minutes
- Yield: Makes approximately 12 mini pancakes (4 servings) 1x
- Category: Breakfast
- Method: Cooking
- Cuisine: American
Description
Delight in these fluffy mini silver dollar pancakes, perfect for breakfast or brunch. Customize them with toppings and enjoy bite-sized happiness!
Ingredients
- 1 cup all-purpose flour
- 2 tsp baking powder
- 2 tbsp granulated sugar
- 1/4 tsp salt
- 1 cup milk (or milk alternative)
- 1 large egg
- 2 tbsp melted butter
Instructions
- Prepare the Batter: In a large mixing bowl, whisk together the flour, baking powder, sugar, and salt until well combined.
- Add Wet Ingredients: In another bowl, whisk together the milk, egg, and melted butter. Gradually pour this mixture into the dry ingredients while stirring gently until just blended. Lumpy batter is fine.
- Heat Your Pan: Preheat a non-stick skillet over medium heat. Test if it’s ready by dropping a small amount of batter onto the surface; it should sizzle.
- Cook the Pancakes: Pour about 2 tablespoons of batter onto the skillet for each pancake. Cook until bubbles form on top (about 2 minutes), then flip and cook for another minute or until golden brown.
- Keep Them Warm: Transfer cooked pancakes to an oven set at 200°F (93°C) to keep warm while you finish cooking the rest.
- Serve and Enjoy: Stack pancakes on plates and drizzle with maple syrup or honey, adding fresh berries or whipped cream as desired.
Nutrition
- Serving Size: 3 pancakes (90g)
- Calories: 220
- Sugar: 6g
- Sodium: 250mg
- Fat: 8g
- Saturated Fat: 4g
- Unsaturated Fat: 4g
- Trans Fat: 0g
- Carbohydrates: 30g
- Fiber: 1g
- Protein: 6g
- Cholesterol: 50mg
Keywords: For extra flavor, consider adding vanilla extract or spices like cinnamon to the batter. You can incorporate mix-ins like blueberries or chocolate chips for an extra treat.

Leave a Comment